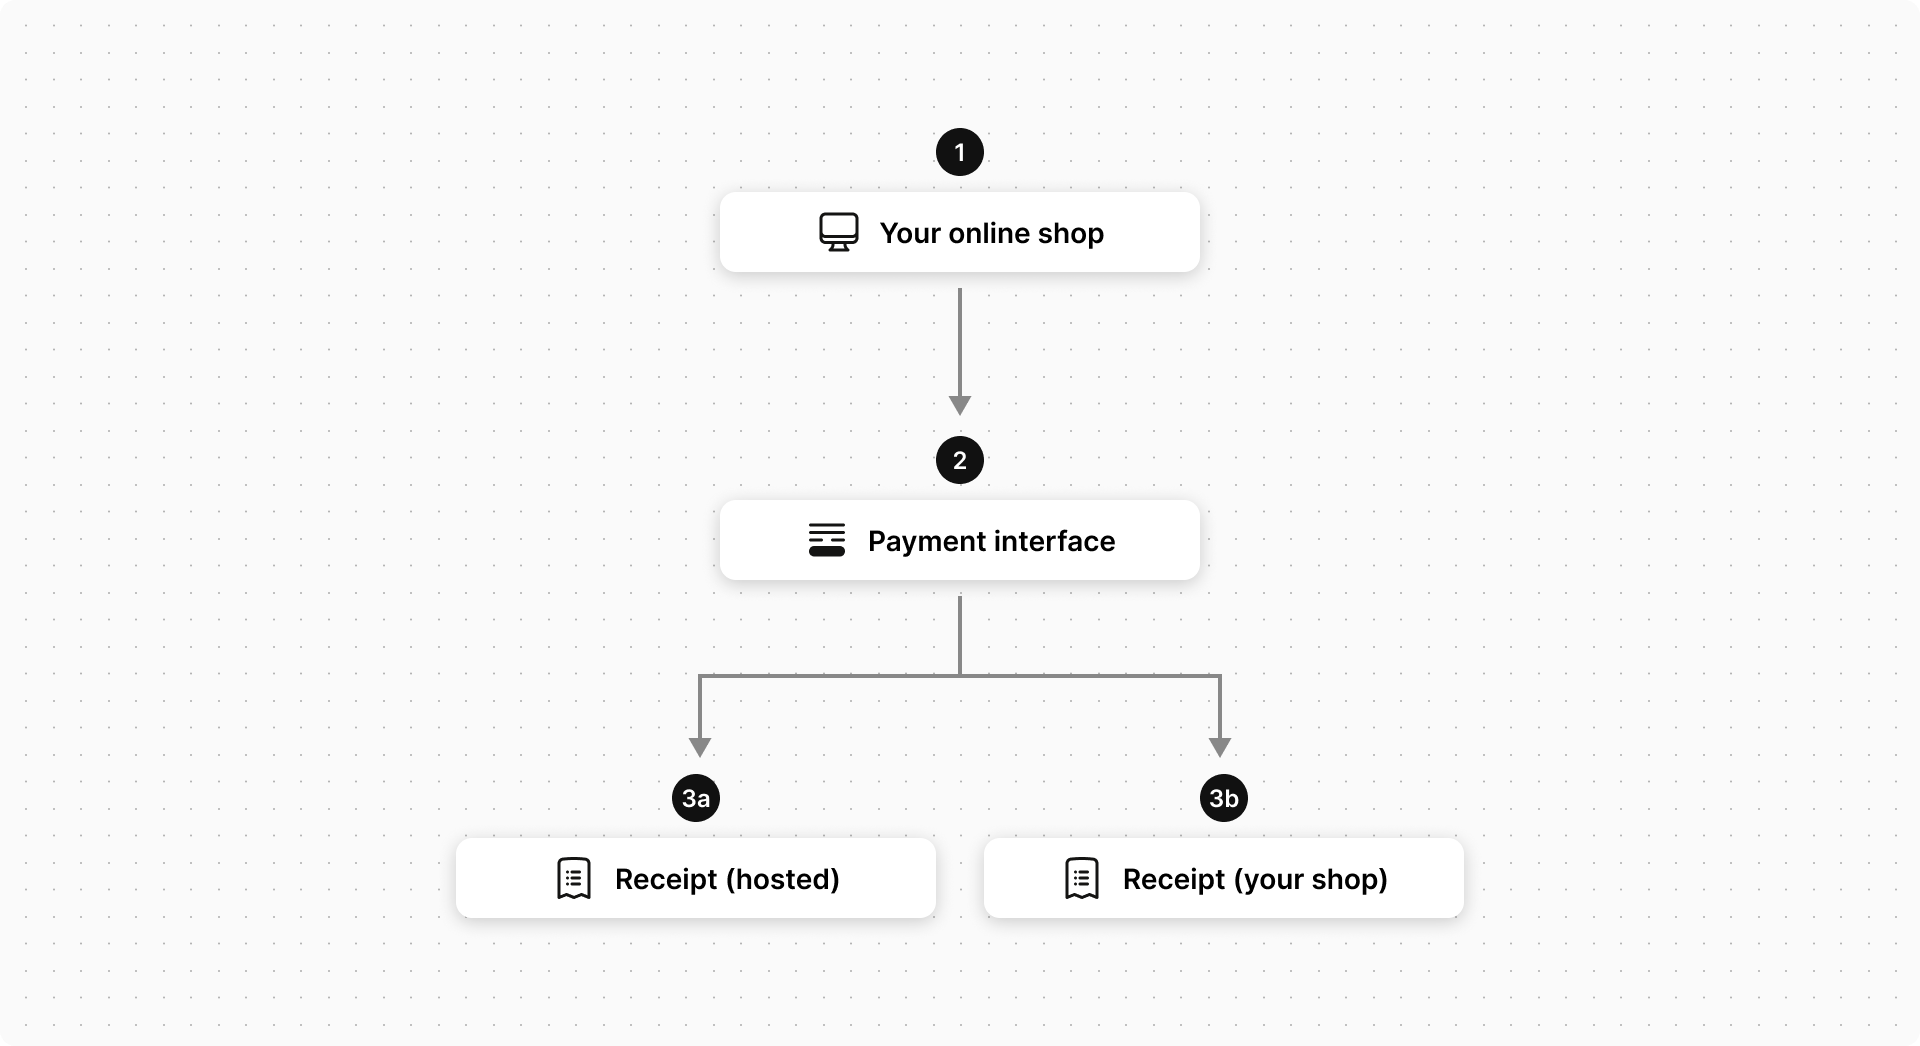
Implementing a Hosted Checkout Integration

Prerequisites

  • Mandatory:

    Ensure that your merchant profile is enabled for the Hosted Checkout service. If not enabled, please contact your service provider. To enable Hosted Checkout for the merchant profile, see the Merchant Manager portal and the Merchant Manager User Guide.
  • Optional:

    If the payment is successful, it is recommended that you opt for the Notifications service to receive notifications through email or Webhook. By opting for this service, you can enable the gateway to send email notifications to the payer on your behalf.
  • Tip:

    Before you begin with the process of integrating hosted checkout functionality, you must see Best Practices and Tips.

Request a Hosted Checkout Interaction

For API version less than 63, use CREATE_CHECKOUT_SESSION to generate a checkout session instead of INITIATE_CHECKOUT.
For all parameters of initiate checkout, see Initiate Checkout.

Select these steps to request a Hosted Checkout interaction:

Step 1: Request a checkout session

Request a checkout session using the Initiate Checkout operation.

Sample code for Initiate Checkout

The request should include payment and interaction data, as well as completion instructions. The following is a sample code snippet for the Initiate Checkout operation.

curl https://paymentgateway.commbank.com.au/api/nvp/version/72 \
-d "apiOperation=INITIATE_CHECKOUT" \
-d "apiPassword=$PWD" \
-d "apiUsername=merchant.<your_merchant_id>" \
-d "merchant=<your_merchant_id>" \
-d "interaction.operation=AUTHORIZE" \
-d "interaction.merchant.name=<your_merchant_name>" \
-d "order.id=<unique_order_id>" \
-d "order.amount=100.00" \
-d "order.currency=USD" \
-d "order.description=<description_of_order>"
For information on how to generate the API password, see Generating API Password.

A successful response to this operation will contain session.id and successIndicator parameters. You can save the value returned in the successIndicator parameter on your shop system to verify the success or failure of the payment. See Obtaining the Payment Result.

Initiate Checkout API Reference [REST][NVP]

Step 2: Refer the checkout.min.js file

Refer the checkout.min.js file from the gateway servers. This will place a Checkout object into global scope.

Sample code for referring the checkout file
<script src="https://paymentgateway.commbank.com.au/static/checkout/checkout.min.js" data-error="errorCallback" data-cancel="cancelCallback"></script>
If you are enabled for both Authorization and Purchase transaction types, you must use Hosted Checkout version 52 or above.

checkout.js Reference[JavaScript]

Step 3: Call Checkout.configure()

Call Checkout.configure(), passing in a JSON object that includes the returned session.id and other request parameters.

Sample code for Checkout.configure()
Checkout.configure({
              session: { 
            	id: '<your_initiate_checkout_ID>'
       			}
            });
From Version 67 or later, the session object is the only field allowed through configure(); all other fields must be included through INITIATE_CHECKOUT.
Data passed in Checkout.configure() will never overwrite data you provided in the Initiate Checkout operation.
Step 4: Start the payment process

Start the payment process by calling one of the following processes.

To display the checkout interaction in an Embedded Page
Checkout.showEmbeddedPage('#embed-target')
To display the checkout interaction on a Hosted Payment Page
Checkout.showPaymentPage()

Sample of HTML code to request a Checkout Interaction

Sample code
<html>
    <head>
        <script src="https://paymentgateway.commbank.com.au/static/checkout/checkout.min.js" data-error="errorCallback" data-cancel="cancelCallback"></script>
        <script type="text/javascript">
            function errorCallback(error) {
                  console.log(JSON.stringify(error));
            }
            function cancelCallback() {
                  console.log('Payment cancelled');
            }
            Checkout.configure({
              session: { 
            	id: '<your_initiate_checkout_session_ID>'
       			}
            });
        </script>
    </head>
    <body>
       ...
      <div id="embed-target"> </div> 
      <input type="button" value="Pay with Embedded Page" onclick="Checkout.showEmbeddedPage('#embed-target');" />
      <input type="button" value="Pay with Payment Page" onclick="Checkout.showPaymentPage();" />
       ...
    </body>
</html>
Values controlling the behaviour of Hosted Checkout may be passed in Checkout.configure() as:
  • Literals – e.g. quantity : 300
  • Functions that return a value, e.g. quantity : function() { return 100 + 200 }.

Functions are executed when the payment process is triggered.

Sample of HTML Code to simulate a Modal Checkout Interaction

Sample code
    <html lang="en">
    <head>
    
    <meta charset="utf-8">
    <meta name="viewport" content="width=device-width, initial-scale=1">

    
    <link rel="stylesheet" href="https://stackpath.bootstrapcdn.com/bootstrap/4.5.2/css/bootstrap.min.css" integrity="sha384-JcKb8q3iqJ61gNV9KGb8thSsNjpSL0n8PARn9HuZOnIxN0hoP+VmmDGMN5t9UJ0Z" crossorigin="anonymous">

    <title>Hello, world!</title>
  </head>
    <body>
        <h1>Hello, world!</h1>
    
        
        <button type="button" class="btn btn-primary" data-toggle="modal" data-target="#exampleModal">
          Launch demo modal
        </button>
    
        
        <div class="modal fade" id="exampleModal" tabindex="-1" role="dialog" aria-labelledby="exampleModalLabel" aria-hidden="true">
          <div class="modal-dialog" role="document">
            <div class="modal-content">
              <div class="modal-header">
                <h5 class="modal-title" id="exampleModalLabel">Modal title</h5>
                <button type="button" class="close" data-dismiss="modal" aria-label="Close">
                  <span aria-hidden="true">×</span>
                </button>
              </div>
              <div class="modal-body" id="hco-embedded">
              </div>
              <div class="modal-footer">
                <button type="button" class="btn btn-secondary" data-dismiss="modal">Close</button>
                <button type="button" class="btn btn-primary">Save changes</button>
              </div>
            </div>
          </div>
        </div>
    
        
        <script src="https://code.jquery.com/jquery-3.6.0.slim.min.js" integrity="sha256-u7e5khyithlIdTpu22PHhENmPcRdFiHRjhAuHcs05RI=" crossorigin="anonymous"></script>
    
        
        <script src="https://cdn.jsdelivr.net/npm/bootstrap@4.5.2/dist/js/bootstrap.min.js" crossorigin="anonymous"></script>
    
        
        <script src="https://paymentgateway.commbank.com.au/static/checkout/checkout.min.js" ></script>
    
    
        <script>
            // Configure Checkout first
            Checkout.configure({
                session: {
                    id: "<your_initiate_checkout_ID>"
                }
            })
            // after the modal is shown, then call Checkout.showEmbeddedPage('#hco-embedded')
                       $('#exampleModal').on('shown.bs.modal', function (e) {

                         Checkout.showEmbeddedPage('#hco-embedded',

                             () => { $('#exampleModal').modal() } // tell Checkout how to launch the modal

                         )

                       });


                     $('#exampleModal').on('hide.bs.modal', function (e) {

                      sessionStorage.clear(); // tell Checkout to clear sessionStorage when I close the modal

                      });
        </script>
    
        
      </body>
      </html>
    

Features of Hosted Checkout functionality

Callbacks

Callbacks are provided to handle events that may occur during the payment interaction.

Use of callbacks is optional, but you must define those you need in the body of the same <script> tag that references checkout.js.

All defined callbacks must have an implementation. They will be invoked when the relevant event is triggered.

Sample code for Callback
<script src="https://paymentgateway.commbank.com.au/static/checkout/checkout.min.js"
         data-cancel="cancelCallback"
         data-beforeRedirect="Checkout.saveFormFields"
         data-afterRedirect="Checkout.restoreFormFields">
</script>

<script>
     function cancelCallback() { 
          confirm('Are you sure you want to cancel?');
         // code to manage payer interaction
    }
// or if you want to provide a URL:
// cancelCallback = "someURL"
</script>

Details

There are two types of callback methods:

Basic Callbacks

Basic callbacks are provided for handling the following events:

  • cancel: When the payer cancels the payment interaction.
    Cancel callback can only be used with payment page, it will not work with embedded page.
  • error: When an error is encountered.
  • complete: When the payer completes the payment interaction.
  • timeout: When the payment is not completed within the duration available to the payer to make the payment.

These can be functions or URLs. If you provide a URL instead of a function in a callback, the payer will be redirected to this URL when the event is triggered.

Redirect Callbacks

Since Hosted Checkout supports payment interactions that require the payer to be redirected away to other websites to progress the payment (e.g. PayPal), callbacks are provided to manage what happens before the redirect and after return to Hosted Checkout to finalize transaction processing.

  • beforeRedirect: Before the payer is presented with the payment interface. Returns data required to restore page state for use by afterRedirect.
  • afterRedirect: When the payer returns from completing the payment interaction. Uses the data saved by beforeRedirect to return the saved payment interface state.

The Checkout object also provides two functions to help you implement the beforeRedirect and afterRedirect callbacks:

  • saveFormFields: Saves all current form fields for use by restoreFormFields. Use in your beforeRedirect implementation or implement beforeRedirect as Checkout.saveFormFields.
  • restoreFormFields: Restores form fields saved by saveFormFields. Use in your afterRedirect implementation or implement afterRedirect as Checkout.restoreFormFields.

checkout.js Reference[JavaScript]

Obtain the Payment Result

After the payment interaction completes, you can return the payer to your shop site and present your own receipt page to the payer. You can also update your shop system with the payment details.

Details
Stage 1: Return the payer to your shop site

To return the payer to your shop site, you must either:

  • provide interaction.returnUrl in the Initiate Checkout operation, OR
  • define the complete callback in the Hosted Checkout request. This applies to both basic and redirect callbacks. See Callbacks.
Stage 2: Determine the result of the payment

The gateway sends the result of the payment in a resultIndicator parameter, which is either:

  • appended to the URL (interaction.returnUrl) used for returning the payer to your shop site, OR
  • provided as an input parameter to the function provided in the complete callback or appended to the URL provided in the complete callback.

You can determine the success of the payment by comparing the resultIndicator parameter to the successIndicator parameter returned in the Initiate Checkout response. A match indicates that the payment has been successful.

The value in the resultIndicator parameter must never be used as the receipt number.
Stage 3: Present the payment receipt on your site

If successful, present a payment receipt to the payer on your shop site, and update your shop system with the payment details. You can retrieve these using the Retrieve Order operation.

Via Merchant Administration

The payment details are recorded in Merchant Administration in the Order and Transaction Details page. You can search for the payment and also perform subsequent operations.

Using Reporting

If you subscribe to Reporting, you can download Hosted Checkout payment data in a formatted report from the CommWeb payment gateway.

Via Email or Webhook Notifications

If you subscribe to email notifications in Merchant Administration, you will receive an email notification for every successful payment.

You can also choose to subscribe to Webhook Notifications to receive an API notification for every payment update.

Customize the Payment Experience

Hosted Checkout allows you to control the display of information about your business and the interaction with the payer using the Initiate Checkout operation.

Sample code for Initiate Checkout Request
URL https://paymentgateway.commbank.com.au/api/rest/version/72/merchant/{merchantId}/session
HTTP Method POST
{
  "apiOperation": "INITIATE_CHECKOUT",
  "interaction": {
    "merchant": {
      "name": "The Company Co",
      "url": "https://www.merchant-site.com",
      "logo": "https://upload.wikimedia.org/wikipedia/commons/2/21/Verlagsgruppe_Random_House_Logo_2016.png"
    },
    "displayControl": {
      "billingAddress": "MANDATORY",
      "customerEmail": "MANDATORY"
    },
    "timeout": 1800,
    "timeoutUrl": "https://www.google.com",
    "cancelUrl": "http://www.google.com",
    "operation": "PURCHASE",
    "style": {
      "accentColor": "#30cbe3"
    }
  },
  "billing": {
    "address": {
      "city": "St Louis",
      "stateProvince": "MO",
      "country": "USA",
      "postcodeZip": "63102",
      "street": "11 N 4th St",
      "street2": "The Gateway Arch"
    }
  },
  "order": {
    "amount": "123.60",
    "currency": "EUR",
    "description": "This is the order description",
    "id": "ORDER-4142773a-ac2e"
  },
  "customer": {
    "email": "peteMorris@mail.us.com",
    "firstName": "John",
    "lastName": "Doe",
    "mobilePhone": "+1 5557891230",
    "phone": "+1 1234567890"
  }
}
The fields provided in the interaction.merchant parameter group will be displayed on the receipt page for the Hosted Payment Page integration only, not for the Embedded Page.
For customizable parameters (Mandatory and Optional), see Initiate Checkout.
Details

You can customize the payment experience with following options:

  • Display Brand Information

    This includes your logo as well as contact details.

    See: All Parameters: Initiate Checkout for below details:

    • Logo reference
    • Merchant info fields
  • Manage Display of Payer Billing and Email Addresses

    After collecting billing and email addresses from your payer, you can display these and control their editability by setting interaction.displayControl.billingAddress and interaction.displayControl.customerEmail fields to one of the following:

    • HIDE: If you do not want Hosted Checkout to display the fields.
    • MANDATORY: If you want Hosted Checkout to display the fields and make data entry compulsory for the payer.
    • OPTIONAL: If you want Hosted Checkout to display the fields, but allow the payer to opt out of entering data into them.
    • READ_ONLY: If you want Hosted Checkout to display the fields, but not allow the payer to edit them.
  • Manage Display of Shipping Details

    After collecting shipping details from your payer, you can control their display by setting interaction.displayControl.shipping field to one of the following:

    • HIDE: If you do not want Hosted Checkout to display the fields.
    • READ_ONLY: If you want Hosted Checkout to display the fields, but not allow the payer to edit them.
    The payer will not be able to edit any of the shipping details previously provided.

    The functionality of the Same as Shipping checkbox will not be available if the required shipping details have not been supplied.
  • Manage Language and Theme

    By default, the language displayed with Hosted Checkout is determined from the payer's browser. However, you can override this behavior by specifying a language identifier or IETF language tag in the locale field; e.g. en_US, es, fr_CA. If the language you specify is not supported by the CommWeb payment gateway, Hosted Checkout is displayed in the best matching language.

    By default, the theme set as default by your payment service provider controls the look and feel of Hosted Checkout. If your payment service provider supports multiple themes, you can choose to override the default theme by providing interaction.style.theme field in your request.

    The theme available for you at this time is <<hppThemes>>.

  • Order ID

    It is recommended that you include order.id in your request to easily identify a payment initiated from Hosted Checkout. You can use an identifier generated by your shopping cart or supply your own. However, ensure that it is unique.

  • Card Number

    When a payer chooses to pay using their card, they can enter either Credit or Debit card details during the checkout interaction. However, if at least one of your acquirers supports combo cards, i.e., cards that can be used either as a debit or credit card, the payer will be required to make a payment method selection on the payment page — Debit Card or Credit Card — to specify the mode the card should operate in for this payment.

3-D Secure Authentication

To use 3-D Secure authentication with your hosted checkout integration, contact your payment service provider to enable the necessary privileges for your merchant account.

To test your integration is functioning with 3-D Secure authentication, you can use your TEST merchant profile in the Production environment.

Use the following test cards to test the integration

Card type Authentication status Test card
Mastercard 3DS2 - Challenge 5123450000000008
Mastercard 3DS1 - Not enrolled for 3DS2 resulting in fallback to 3DS1 5506900140100305
Visa 3DS2 - Challenge 4440000009900010
Visa 3DS1 - Not enrolled for 3DS2 resulting in fallback to 3DS1 4508750015741019

For further information regarding authentication, see Authentication FAQs.

Enabling EMV 3DS

EMV 3-D Secure (EMV 3DS) is a global industry standard designed to help merchants and issuers authenticate Card-Not-Present transactions. The latest generation of EMVCo industry standards -called EMV 3-D Secure or EMV 3-D Secure 2.0 –is a more robust protocol and stronger authentication than the current version (3-D Secure 1). Enabling EMV 3DS improves your digital payment experience by reducing fraud, false declines and unnecessary friction.

Details

Prerequisites for Merchants (India and Bangladesh only)

  1. The Merchant’s acquirer needs to complete their Acquirer’s prerequisites.
  2. Additional configuration is required on the Merchant’s profile in the payment gateway, for each scheme their acquirer supports.
  3. Mastercard, Visa and Amex require an additional Merchant privilege. This can be configured in the Merchant Profile Page > Payment Details Page > Card Holder Verification section within the Merchant Manager Portal.

Merchant integration

  1. Integrate against Web Services API (WS-API) v57 and above.
  2. Follow the described steps on the help page below:

    Payer Authentication via Hosted Checkout

  3. Enable EMV 3DS via Merchant Administrator by navigating to: Admin > Integration Settings > Hosted Checkout

Achieve WCAG (Web Content Accessibility Guidelines) Compliance

Hosted Checkout may be configured to provide a user experience compliant with WCAG 2.0 Level AA. See WCAG 2.0 guidelines and ensure your website conforms to this technical standard.

Details

Set the lang attribute

Add lang attribute to the html element.

Sample code for Callback
<html lang="en">
    <head></head>
    <body></body>
</html>

Support for Payment Details Verification

For and payments, Hosted Checkout only supports payment details verification.

Details

You can do this by setting interaction.operation=VERIFY in the Initiate Checkout request.

Hosted Checkout uses the verification methods supported by the configured acquirer and the data provided in the request.

You can determine the success of the verification operation by comparing resultIndicator to successIndicator.

If the interaction was not successful, Hosted Checkout displays a message indicating that verification has failed and prompts the payer to try again.

Support for non-eCommerce Integrations

You can use Hosted Checkout with any transaction source configured on the merchant profile (Internet, Call Centre, Telephone Order, etc).

Details

You can do this by providing transaction.source in the Initiate Checkout request.

If a Hosted Checkout is requested with transaction.source other than INTERNET, payment options that require the payer to be present will not be supported.

If you do not provide transaction.source in the request:

  • It defaults to INTERNET if supported on the merchant-acquirer link.
  • If not supported, it defaults to the transaction source in your merchant profile.

Control Card Security Code

You can control whether payers are required to provide the Card Security Code to process the payment by setting interaction.displayControl.cardSecurityCode in the Initiate Checkout request to one of the following values:

  • OPTIONAL: If you want Hosted Checkout to display the Card Security Code input field but input to this field is not mandatory.
  • MANDATORY (default): If you want Hosted Checkout to display the Card Security Code input field and make it mandatory.
Be careful about making the Card Security Code optional, as some acquirers may require it to process the transaction.

Initiate Checkout API Reference [REST][NVP]

Bypass Security Features

If you are configured for 3-D Secure authentication or a risk management service, you have the option to bypass these should you wish to do so.

Details
  • Bypass Payment Authentication: Set interaction.action.3DSecure=BYPASS in the Initiate Checkout request.
  • The interaction.action.3DSecure field in the CREATE_CHECKOUT_SESSION request can take values:

    • BYPASS: Do not offer 3DS authentication to the payer.
    • MANDATORY: Offer 3DS authentication to the payer if it is available.
  • Bypass Risk Assessment: Set risk.bypassMerchantRiskRules=ALL in the Initiate Checkout request.

Click To Pay

To use Click To Pay with your hosted checkout integration, contact your payment service provider to enable the necessary privileges for your merchant account.

Enabling Click To Pay

Click to Pay is an intelligent, password-free online checkout option that provides a quick and easy checkout experience designed to make ‘guest checkout’ faster and easier across all devices. Click to Pay provides a standardized checkout flow for all participating card schemes. Click to Pay is built off EMVCo's SRC specification and replaces Masterpass, Visa Checkout and Amex Express Checkout.

If you are using the gateway's payment page (Hosted Checkout), Click to Pay will automatically be offered to your payers if you have activated Click to Pay for your merchant profile.

Prerequisites for Merchants

  1. The Merchant’s acquirer needs to complete their Acquirer’s prerequisites.
  2. Enroll in Click To Pay via Merchant Administrator. Please see details here.
  3. Integrate against Web Services API (WS-API) v63 and above.

Other Considerations

  • Shipping Address: Payers will not be able to select a shipping address during the Click to Pay interaction, if shipping address is required, the merchant must prompt for this information prior to launching Hosted Checkout.
  • Billing Address: A billing address will always be collected during the Click to Pay interaction.
  • 3-D Secure Authentication:If you are configured for 3-D Secure (3DS) Authentication, Hosted Checkout will automatically perform the 3DS authentication after the Click to Pay interaction.

There are additional parameters to consider when sending the Initiate Checkout request for Click to Pay with Hosted Checkout.

Details

Initiate Checkout Parameters for Click to Pay with Hosted Checkout:

Field Description Required
interaction.country For an SRC interaction, the interaction country determines country-specific content presented to the payer during the SRC interaction such as Terms and Conditions. The value you have configured against your merchant profile in the gateway is used by default. Add the interaction.country field to the Initiate Checkout request if you want to override this value for this interaction. Optional
interaction.locale For an SRC interaction, the interaction locale determines the display language. By default, the language configured in the payer's browser is used. If the payer's language cannot be determined or is not supported, en_US is used. If you want to override this value, add the interaction.locale field to the Initiate Checkout request. Currently, the supported languages are English (UK) (en_UK), Spanish (Spain) (es_ES), French (Canada) (fr_CA), Portuguese (Brazil) (pt_BR), and Chinese (Hong Kong) (zh_HK). Optional
merchant.name Provide your trading name such as the name known to your payer. The name may be displayed during the SRC interaction. Required
merchant.url Provide the URL of your website that the payer is using. The URL may be displayed during the SRC interaction. Required
customer.email The payer's email address will always be collected during the SRC interaction. If you already know the payer's email address, add customer.email: "your payer email address" to the Initiate Checkout request to allow the payer to bypass entering their email address during the SRC interaction. Optional

For further information regarding Click To Pay, see FAQs.

Test Your Integration

Before going live, you must test your integration to ensure correct functionality.

Test your Integration with Click To Pay

Before going live, you must test your integration to ensure correct functionality.

Troubleshooting and FAQs

What should I do if Hosted Checkout returns an error?

Hosted Checkout can return a number of integration errors. See Test Your Integration.

Why am I getting an error page?

An error page is provided when an incorrect Hosted Checkout request is attempted. Common causes for errors include:

  • The mandatory fields have not been supplied.
  • URLs provided in the request are not absolute.
What happens if the payer double submits (double clicks) the "Pay" button?

If the payer double submits the "Pay" button, the transaction will not be repeated with your or the payer's bank.

Are Microsoft browsers supported by Hosted Checkout?

Yes, EDGE 113 is supported.

Best Practices and Tips

How secure is the Hosted Checkout integration?

The Hosted Checkout model is secure as it requires you to authenticate to the gateway, and the payment details collected on the payment page are submitted directly from the payer's browser to the gateway.

If you choose not to return the payer to your shop site, it is recommended that you check the notification email or log onto Merchant Administration to ensure that the order details are correct before you ship the goods or services to the payer.
Are there any restrictions on the file size and dimensions for the merchant logo displayed on the payment page?

There are no restrictions on the file size or logo width. As for height, the minimum recommendation is 144 px.

Can I use any hosted provider for hosting the logo image?

Yes, you can host your logo image on any provider, however; it's mandatory that the URL is secure (HTTPS). If your hosted provider does not support a secure URL, here's a list of providers that can offer you free HTTPS hosting: https://www.google.com.au/search?q=secure+image+hosting+providers

Why is the Same as Shipping checkbox sometimes not shown?

This checkbox is visible only if all required fields in the shipping address have been provided. You must ensure that either the payer has completed these, or that you supply any missing ones (such as shipping.country, in the case where goods are not being shipped internationally).

How can I optimize my mobile interactions with Hosted Checkout?

If you would like to offer your customers a good mobile experience including optimizing your Hosted Checkout experience on mobile, it is a best practice to add a 'viewport' meta tag to your site's page. For example,

<meta name="viewport" content="width=device-width, initial-scale=1">

Please note that it's important to choose the right viewport values for your pages and to test your own site with these changes.

Copyright © 2023 Commonwealth Bank of Australia